Banana Bread Bars

You know what coffee shop I love??? Gregory’s. They have delicious coffee and reallllly tasty baked goods. You know what I don’t love about Gregory’s Coffee though? The fact that ONE energy ball is $3.50!!!! Every time I buy one of them I savor every bite while simultaneously kicking myself for spending $3.50 on a tablespoon of rolled mush.

These banana bread bars are inspired by Gregory’s energy bites but TBH they don’t taste anything like them. I made these as simple as possible because that’s how I live my life :)

You can spice them up (literally) with cinnamon or nutmeg; maybe add some coconut flakes; get really wild add some chocolate chips - the world is your oyster. If you have a peanut allergy you could also skip the powdered peanut butter and just add a bit more oatmeal to soak up the moisture. Maybe do a little flax meal - hey I’m down for a good time. These bars are great to grab and go in the morning, as a mid-afternoon snack, or a pre-workout bite to fuel you towards your gains. Whatever it is, enjoy!

Copy of Keto (1).png

Ingredients:

  • 3 ripe medium bananas

  • 2 cups rolled gluten-free oats

  • 3 scoops Naked Nutrition chocolate peanut butter powder

  • 1 T chia seeds

  • 1/4 tsp baking powder

  • dash of salt

  • Optional add in’s: coconut flakes, nuts, seeds, cranberries, raisins, chocolate chips

Directions:

  1. Preheat oven to 350 and line a cookie sheet with aluminum foil or parchment paper. (We ran out of parchment paper so I had to use aluminum foil - just be sure to spray with cooking spray)

  2. Mash bananas in a large bowl

  3. Stir in dry ingredients

  4. Using about 2 T of “dough” form into a rectangle and place on cookie sheet. This should make about 8-10 bars depending on the size

  5. Bake for 12 minutes

  6. Allow to cool for 5 minutes.

  7. Store in airtight container and keep in the refrigerator to last longer. You can microwave for 15-20 seconds to get them all goey again :)

Banana Bread Bars

Banana Bread Bars

2-Minute Chocolate Mug Cake

I know it’s probably bad to say as a dietitian, but I don’t like to make complicated things in the kitchen. I love BEING in the kitchen, but I like to keep things simple. This mug cake is a great way to make busy mornings super easy. Just mix the dry ingredients at night, wake up, stir in the liquid, microwave and boom!

Or, if you are like me and cannot finish dinner without something sweet/chocolatey, this mug cake is an awesome way to seal the meal.

2-Minute Chocolate Mug Cake

2-Minute Chocolate Mug Cake

Ingredients:

  • 1/3 cup Birch Benders Paleo Pancake Mix (scroll down to food section)

  • 1 T cacao powder

  • dash of sea salt

  • 1/3 cup almond milk (or milk of your choice)

  • 1/4 tsp vanilla extract (optional)

  • Toppings (optional): peanut butter, nuts, coconut flake, cacao nibs

Directions:

Note: I normally eat a mug cake straight from the mug, but I wanted to showcase all of its beauty. If you’d like to do the same, spray the mug with some cooking spray or wipe down the sides (and bottom) with coconut oil.

1) Combine pancake mix, cacao powder and sea salt in mug.

2) Stir in almond milk and vanilla extract.

3) Microwave for 60 seconds.

4) Top with peanut butter or any other topping you like and enjoy warm!

1825F809-E3B8-43BD-8870-ABDD30F25065.JPG

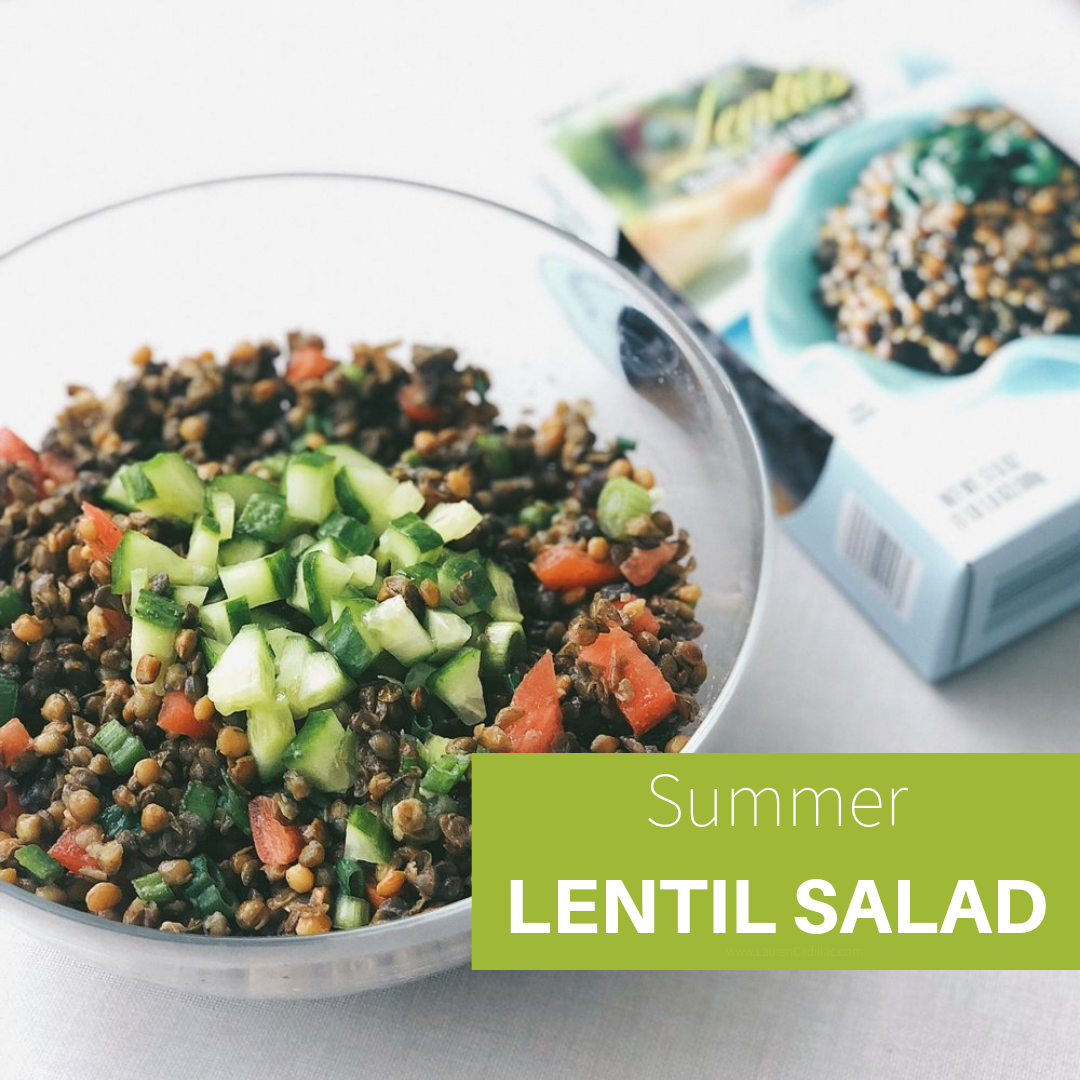
Summer Lentil Salad

Trader Joe’s does it again with their steamed, ready-to-eat lentils. This definitely isn’t a new product, I’m just late to the game and bummed I’ve been missing out on such deliciousness this whole time. This lentil salad is great as a meal, a side, a snack or on top of a salad. It has a summery feel to it because it’s a cold salad and because of the lime flavor, BUT thanks to climate change who can even keep track of what season we’re in?? The best part about this recipe….it takes about 5 minutes to make!

Keto (12).png
375ED06A-9DA7-41FB-9734-8BACD1F742A0.JPG

Ingredients:

  • Trader Joe’s steamed lentils (1 box)

  • 1/2-1/3 cup chopped scallions (depending on how big of a scallion fan you are)

  • 1/3 cup diced tomatoes

  • 1/3 cup chopped cucumber

  • juice from 1 lime

  • salt / pepper / garlic to taste

Directions:

  1. Combine all ingredients in a large bowl and mix well (unless you’re trying to go for aesthetics for blogs and or social media then mix everything but the cucumbers together and then carefully place chopped cuc’s in a pile in the middle).

  2. Serve cold.

Homemade Nutella

Not going to lie, I was patting myself on the back for this one. This homemade Nutella tastes just like the stuff you’d buy in the store!

Homemade Nutella

Homemade Nutella

Ingredients:

  • 2 1/4 C dry roasted hazelnuts

  • 1 T + 1 tsp coconut oil

  • 2 T cacao powder

  • 8-12 drops liquid stevia

Directions:

  1. Add hazelnuts and coconut oil to food processor or high-speed blender like a Vitamix (if using Vitamix like I did, you’ll need to use the tamper)

  2. Blend / process on high for 1-2 minutes

  3. Add cacao powder

  4. Blend

  5. Scrape from sides with rubber spatula

  6. Add 8 drops of stevia, blend and taste. Add more for more sweetness

  7. Use a rubber spatula to scrape nutella from sides of the blender/processor into a glass jar or dish

  8. Enjoy with apples, bananas, toast or my favorite way, straight from the jar with a spoon :)

Roasted Tomato Soup

So I can’t take credit for this recipe because my client actually made this soup for me. She sent me the recipe to replicate but it’s so darn good that I asked if she’d be cool if I shared it with you guys. She’s the best so here you have it!

Dairy-free Roasted Tomato Soup

Dairy-free Roasted Tomato Soup

Ingredients:

Part 1

  • 7-8 vine tomatoes, quartered

  • 1 c cherry tomatoes

  • 1 c cremini mushrooms, sliced

  • 1/4 cup extra virgin olive oil

  • 1.5 T balsamic vinegar

  • 8 cloves garlic

  • 10 sprigs thyme

  • 1/2 t salt

  • 1/4 t black pepper

  • 1/8 t cumin

Part 2:

  • 2.5 T grass-fed Kerrygold butter (can use EVOO if you are vegan)

  • 1 mirepoix container from Trader Joes (or 1/2 C each: chopped onions, celery and carrots)

  • 10 sprigs thyme

  • 1, 6 oz can tomato paste

  • 1 c chicken or vegetable broth (vegetable if vegan)

  • 1/4 t Trader Joe’s Everyday Seasoning OR 21 Salute Seasoning (optional)

  • 1 handful fresh basil’

Directions:

  1. Preheat oven to 370 degrees and line a baking sheet with aluminum foil

  2. In a large bowl, combine all ingredients from part 1 and mix thoroughly

  3. Transfer to baking sheet and roast in oven for 30 minutes

  4. When the tomato mixture has about 10 minutes remaining, brown the butter in a large pot over medium heat

  5. Add the mirepoix and thyme and stir frequently

  6. When the timer goes off for the tomato mixture, remove from oven. Spoon ~1/3 c of the juices into the pot with the mirepoix

  7. Place tray of tomatoes back into the oven and roast for another 30 minutes

  8. Add can of tomato paste to pot, stir and continue to cook (stirring frequently) until mixture turns into what looks like a pile of mush

  9. When the tomatoes have finished roasting, remove from oven, remove sprigs of thyme (from the tomato mixture and from the mirepoix) and add to pot

  10. Add broth, and everyday seasoning, stir and allow to simmer for 10 minutes

  11. Add basil, simmer for another 5 minutes

  12. Turn off flame

  13. Use a high power blender or immersion blender to puree and emulsify the soup

  14. Serve hot, preferably with a side of grilled cheese

Truffle Cream of Mushroom Soup

If someone asked me what the best meal of my life was, I would without any hesitation say Truffle Ravioli from a restaurant in Long, Branch, NJ. If I was to eat it now however, I’d have to probably take 2 personal days. So I attempted to recreate something as delicious without the GI upset. I give you….

Dairy-Free Truffle Cream of Mushroom Soup

Dairy-Free Truffle Cream of Mushroom Soup

Dairy-Free Truffle Cream of Mushroom Soup

Ingredients:

  • 1/2 medium yellow onion, diced

  • 1 small zucchini, cubed

  • 10 oz package sliced mushrooms

  • 2.5-3 T truffle oil (will be used in two parts)

  • 20 oz broth (I used chicken)

  • 4 oz canned coconut milk

  • 1/2 tsp salt (I used truffle salt for a truffle explosion

  • 1/4 tsp black pepper

  • 1/4 tsp garlic powder

Directions:

  1. In a large pot, heat 1.5-2 T truffle oil (depending on how strong you want the truffle flavor to be) over medium heat.

  2. Add in diced onions and cook for 2 minutes.

  3. Add in zucchini and stir to incorporate the oil and onion mixture. Cook for another 2 minutes

  4. Using only 2/3 of the 10 oz package of mushrooms, add to pot, stir and cook for another 2 minutes.

  5. Pour in chicken broth and let simmer for 5 minutes.

  6. Add coconut milk, salt, pepper and garlic powder and continue to cook for another 5-10 minutes until all vegetables are fork tender.

  7. While the soup is simmering, heat another 1-1.5 T truffle oil in a frying pan and sauté remaining mushrooms.

  8. Remove pot from heat. Use an immersion blender (or regular blender) to puree.

  9. If you used an immersion blender, stir in sautéed mushrooms and serve hot. If you used a regular blender, pour soup back into the pot, stir in sautéed mushrooms and serve hot.

Avocado Pesto

Who doesn't love a perfectly ripe avocado??? If you answered "I don't" then this probably isn't going to work out between us and maybe we should start seeing other people.......A soft avocado is one of life's greatest pleasures; as is pesto: another gift from God and favorite of mine.  So I decided to bring my true loves together and give pesto a MUFA / fiber-filled makeover. I give you, Avocado Pesto. Add some to a bowl of zoodles, spread some on top of grilled chicken or use as a salad dressing alternative. You could also just eat it with a spoon like I end up doing :) Enjoy!

AdobePhotoshopExpress_2018_01_15_11_52_07.jpg

Avocado Pesto 

Ingredients:

  • 1 cup fresh basil

  • 2 large (or 4 small (I love the teeny tiny ones from Trader Joes)

  • 1/4 cup extra virgin olive oil

  • 1/3 cup pine nuts

  • 1/3 cup lemon juice

  • 6 cloves of garlic

  • 1 tsp pink Himalayan salt (regular sea salt is fine)

  • pepper 

Directions: 

  1.  Combine all ingredients in food processor until a creamy consistency is reached. Taste and season to your liking with salt and pepper (You can also combine the ingredients in a bowl and blend with an immersion blender if you don't have a food processor).

Instant Pot Bone Broth

If you guys follow me on Instagram, you know I’m ALWAYS raving about bone broth. Bone broth is high in minerals such as magnesium, calcium, phosphorus, silicon and sulfur. It is also high in glucosamine and chondroitin sulfate which are associated with reducing inflammation and joint pain. Bone broth is high in collagen which can also help maintain healthy skin.

Okay so great! We know it’s good for you but how the heck do you make it?! I’ve receive a ton of questions via social media on how I make my bone broth so I figured I would blog about it AND make a video. So whether you are a visual learner or prefer to just read a recipe, here you go!

Instant Pot Bone Broth

Ingredients:

  • 2 lb beef, neck & knuckle bones (can also use chicken, pork or fish bones-USE HIGH QUALITY BONES, ideally GRASS-FED, GRASS-FINISHED. I got mine from Hudson & Charles)

  • 1 tub of chopped mirepoix from Trader Joe’s (or 1/3 C of each: celery, carrots, onions)

  • 4-5 garlic cloves, peeled

  • 2 T organic, unpasteurized apple cider vinegar (I like Braggs - check out more ways to use ACV)

  • 2 t pink himalayan salt

  • 1-2 t black pepper

  • 1 tsp crushed bay leaves (or 3-4 whole leaves)

  • 4-5 quarts filtered water (fill up to max fill line)

Directions:

  1. Plug in instant pot and click “soup” button. Using arrows, increase time to 230 minutes.

  2. Place bones into pot (it’s ok if the bones are frozen) and then add the mirepoix, apple cider vinegar, garlic, salt, pepper and bay leaves.

  3. Pour in filtered water until it reaches the max fill line. Stir.

  4. Secure the lid and let cook for 230 minutes.

  5. When the time is up, slowly and carefully shift the pressure value to the left or right to SLOWLY release some pressure. DO NOT look over the valve or put your hand over it as it could easily burn you. Be very careful and let the steam out slowly.

  6. When you no longer see or hear steam escaping, it is safe to open. Remove lid.

  7. Place a colander (with very fine holes) in large pot. Using a towel, dish rag or oven mits, pour the contents through the colander allowing all the liquid to pool in the pot.

  8. Discard the contents of the colander. (Thick beef bones can be saved to make a second batch of broth. Note: This second batch will be less flavorful and not contain nearly as many nutrients. It will likely not gel either as there will not be much collagen).

  9. Let cool for 30 minutes and divide into glass jars (You can also place a few ice cubes in the broth - it’s likely extremely concentrated so this little bit of ice shouldn’t do much to the flavor).

  10. Once the broth has cooled, transfer to fridge.

  11. Broth should keep 3-4 days in the fridge. To extend life, store in the freezer.

  12. Once cool, a layer of fat will form at the top of the jar. This fat is nutrient dense and great for cooking or baking. Skim the top and save for later use. (Fat can also be discarded).

  13. The broth will (hopefully) form a gel once it has cooled. This is a good thing! This means a lot of collagen was pulled from the bones! To consume, heat broth up on the stovetop and gel will turn into a liquid.

  14. I recommend having a cup a day! A cup a day keeps the doctor away!

IMG_5267.jpg

Coconut Chicken and Turmeric Cauliflower Rice

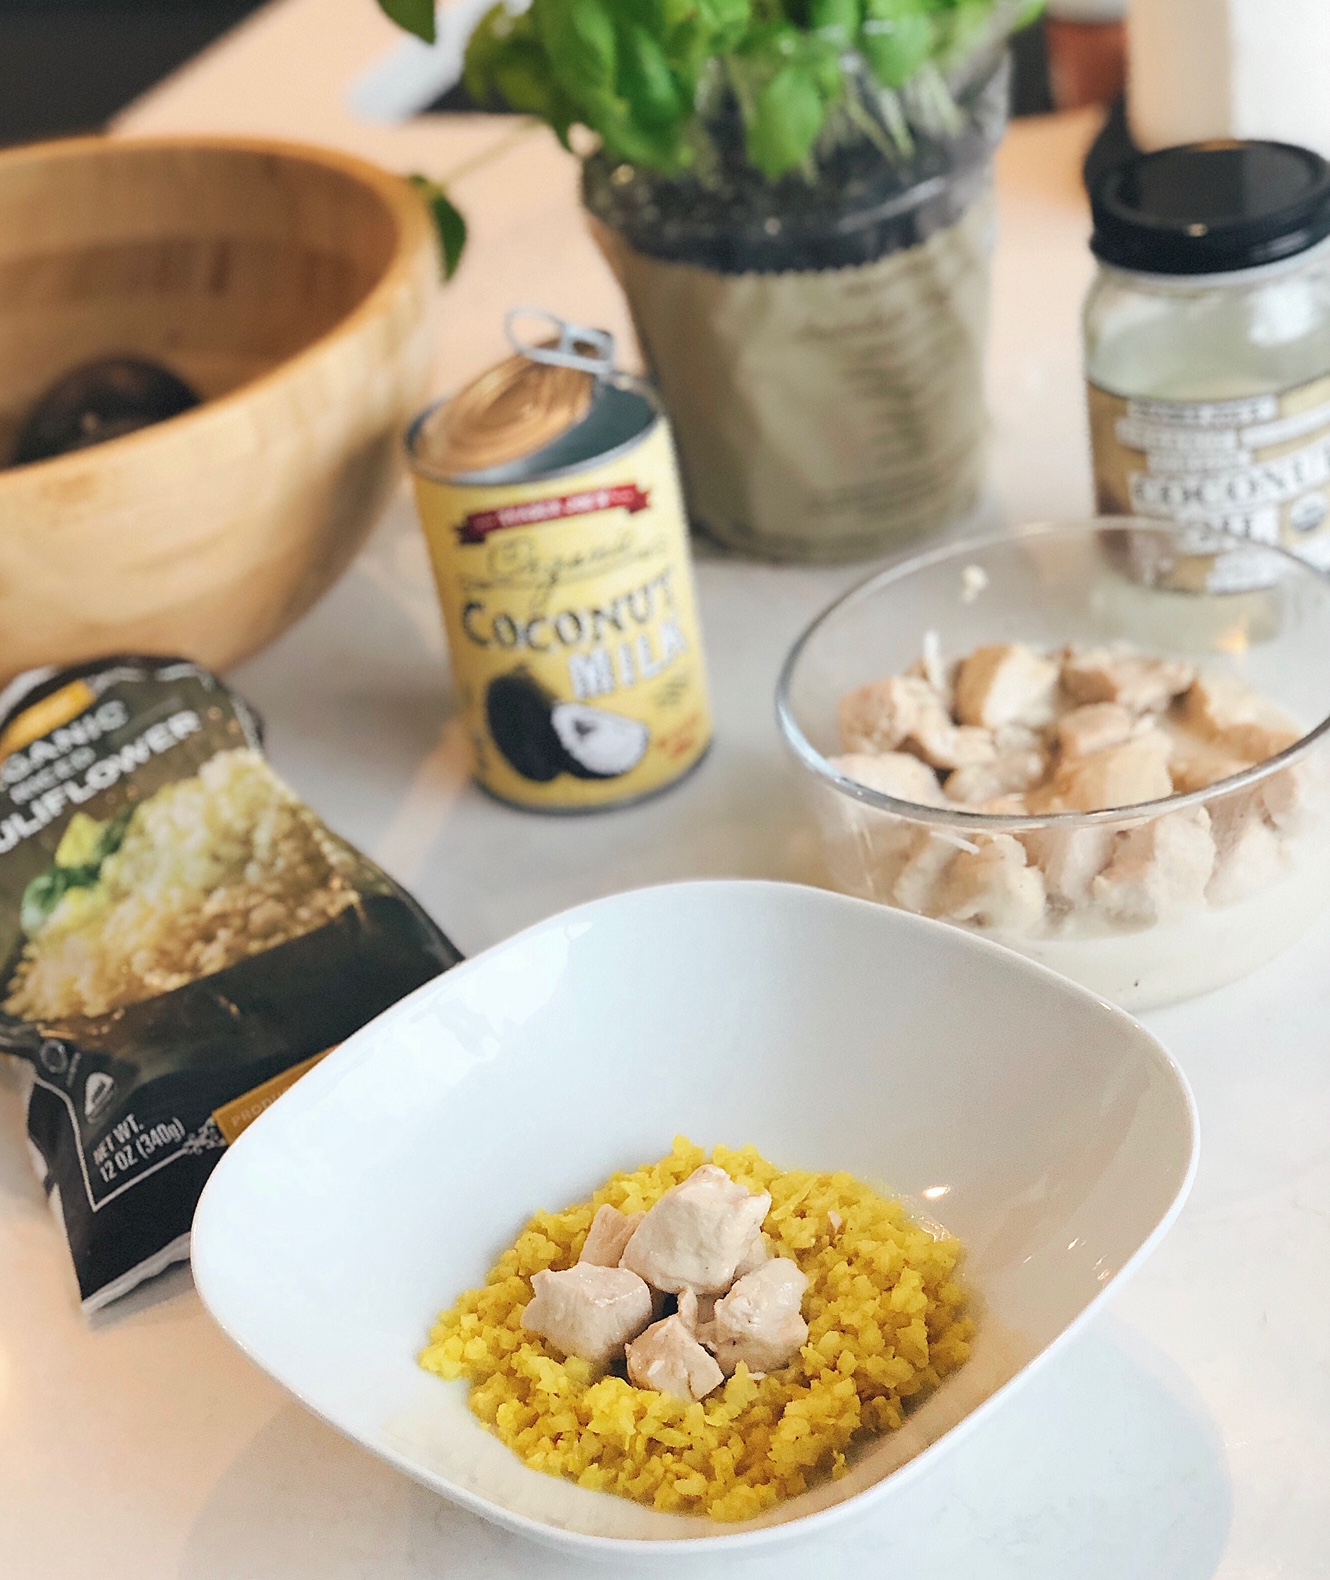
This recipe makes me so incredibly happy. Between the healthy fats (MCT) from the coconut oil, the high quality protein and anti-inflammatory properties of the turmeric, this dish packs a 1,2-punch! This recipe is a great way for anyone to make chicken interesting, not to mention it is incredibly easy and straight forward. Not sure about you guys, but whenever I see a recipe that calls for more than like 10 ingredients I’m just like…nope! Or when a blogger writes 3 chapters of their life story before getting to the ingredients! GIVE ME THE RECIPE ALREADY!!! To make it easier, I’ll break these two recipes up. Let’s start with the turmeric cauliflower rice.

IMG_4451.JPG

Turmeric Cauliflower Rice

Ingredients:

  • 2 T organic virgin coconut oil

  • 1/2 t ground turmeric

  • 12 oz frozen riced cauliflower (Trader Joe’s has the hook up of course)

  • 1/2 t pink himalayan salt

  • 1/4 t black pepper

  • 2 T unsweetened coconut flakes

  • fresh parsley or cilantro (optional for garnishing)

Directions:

  1. Heat a large pan over medium heat. Once the pan is hot, add coconut oil and then turmeric.

  2. Stir turmeric into coconut oil for 30 seconds to warm.

  3. Add frozen cauliflower rice and cook for 2-3 minutes until soft.

  4. Add the salt, pepper, coconut and toss until well incorporated.

  5. Cook for an additional 2-3 minutes. Taste and adjust salt/pepper as desired.

  6. Top with chopped cilantro or parsley.

Coconut Chicken

Ingredients:

  • 1 pound organic, boneless, chicken breast, cut into chunks (or thighs-thighs are higher in fat, will taste more moist and is recommended for keto folks)

  • 1 T organic virgin coconut oil

  • 4 T unfiltered, unpasteurized apple cider vinegar (I use Braggs - check out more ways to use ACV )

  • 1/4 cup filtered water

  • 4-5 cloves of garlic, peeled and crushed

  • 1/2 t pink himalayan salt

  • 1/2 t black pepper

  • 8 oz canned coconut milk

Directions:

  1. Add the coconut oil and diced chicken to a medium sauce pan over low-medium heat. Cook for 2 minutes

  2. Add the vinegar, water, and garlic and cooked for 3 minutes

  3. Add the salt and pepper and cook until almost all of the liquid boils down. This will probably be around 10 minutes.

  4. Stir in the coconut milk and simmer over low heat for 5-10 minutes until the liquid thickens.

  5. Serve over turmeric cauliflower rice.

Enjoy!